Github Actions for web apps
Posted by Luke on the
Filed under technology, webdev
Arguably, the key feature that made Gitlab a market leading platform was their decision to build the platform as an end-to-end application delivery service including version control, CI, Infrastructure, community engagement, and so on. The simplicity that comes with this centralisation made Gitlab really stand out when compared to the Atlassian suite of Bitbucket, Jira, Bamboo. Even more when compared to Github at the time, since their market offering pretty much started and ended at git (with some other things like gh-pages, marketplace, etc).
It has been a couple years since Gitlab's rise to prominence and the market has certainly shifted. Even before Github was acquired by Microsoft in Mid 2018 (source), they were hard at work pushing out feature after feature.
Off the top of my head, I can recall these:
- Projects (Kanban boards with automated status changes)
- Sponsor program
- Package Registry (publishing for npm, NuGet, Ruby gems, all in the same platform)
- Github Actions (my personal favourite)
Github actions is now in open beta (you can opt in here: https://github.com/features/actions) and it enables you to set up containerised builds, testing, deployments in response to many github events (push, pull requests, tags, schedule).
The process is much the same as something like CircleCI, Travis, or Buildkite. The integration for CI checks on pull requests and commits has been in Github for years, allowing early warning for pull requests that break the build.
In this post I'll be showing you how to set up to build and release a single-page app running React.
Keep in mind that the v1 Github Actions syntax has been deprecated, so make sure you are looking at the yaml documentation. There's a handy warning at the top of the deprecated pages:
The documentation at https://developer.github.com/actions and support for the HCL syntax in GitHub Actions will be deprecated on September 30, 2019. Documentation for the new limited public beta using the YAML syntax is available on https://help.github.com.
Find the docs here: https://help.github.com/en/categories/automating-your-workflow-with-github-actions
For this example, I'll be using Create React App. Initialise that if you'd like to follow along, or just retrofit an old, simple project.
There's two flows I want to create
- CI Only
- CI and Deploy
Let's create the action file.
Create a folder in the root of your repo .github/workflows
Create a file in that folder called ci.yml
Let's look at the ci.yml file and add some boilerplate
ci.yml
name: CI

on: [pull_request, push]

jobs:
    build:
        runs-on: ubuntu-18.04

        steps:
            - uses: actions/checkout@master
            - name: Use Node.js 10.x
              uses: actions/setup-node@v1
              with:
                  version: 10.x
            - name: Build
              run: |
                  npm install
                  npm run build --if-present
The first thing to note is on line 3, there is an option called on (docs for on. This field is a list of signals you want to respond
to. For this one, I'm only doing it on pull request. Because this on property is at the top level, regrettably you
can't combine all your steps and choose not to run some steps on pull request. This is the reason for having two
separate action files. In principle, the actions should be entirely self contained processes.
The jobs is a list of independent actions. By default, they run in parallel. You could use this to separate things like your unit and integration tests to speed up your CI. This example is pretty simple, so I haven't found a use for the jobs yet.
The steps field is quite simple in this example. For each step, you can chose to specify the uses field (docs).
The format for this argument is [owner]/[repo]@[ref] or [owner]/[repo]/[path]@[ref].. You can reference actions in
your current repository or you can reference standard actions as per the example above.
actions/checkout@master checks out the current branch. actions/setup-node@v1 sets up Node, probably
through a Docker container. You can provide arguments to the action using the with key.
Now, the magic begins. Go to your repository and visit: https://github.com/[yourName]/[yourRepo]/actions. You'll be prompted
to enable Actions for this repository. Hit enable and then commit your ci.yml file, push it up and check the Actions tab.
You should begin to see your commits start popping up under the relevant action.

In the image below, you can see the left side has the name of the action, the event that triggers it, and the jobs below that.

With luck, we now have our CI build successfully running. Onto the deployment action. Copy the below to your ci.yml
ci.yml
name: CI

on:
    pull_request:
    push:
        branches:
            - master

jobs:
    build:
        runs-on: ubuntu-18.04

        steps:
            - uses: actions/checkout@master
            - name: Use Node.js 10.x
              uses: actions/setup-node@v1
              with:
                  version: 10.x
            - name: Build
              run: |
                  npm install
                  npm run build --if-present
            - name: Deploy
              if: github.event_name == 'push' && github.ref == refs/heads/master
              env:
                  AWS_ACCESS_KEY_ID: ${{ secrets.AWS_ACCESS_KEY_ID }}
                  AWS_SECRET_ACCESS_KEY: ${{ secrets.AWS_SECRET }}
              run: node scripts/deploy.js
You'll note that at the moment we're executing this on both:
- pushes to master branch
- pull requests
This means that unless we add a filter, we'd be deploying branches on any pull request, which could probably break our app.
To the Deploy step, we've added an if. This if should have a boolean
value that will determine whether to run the step or not.
You could do things like check if a step was successful, or in our case:
- Make sure the event is a push
- Make sure the branch is master
Moving onto deployment, if you look at the env key, this is how we
provide environment variables to the step. These are accessible in
node scripts via process.env. SOME_API_KEY in this example is a
hardcoded string. Github also provides a secrets manager within your
repository. Don't worry about that node script yet.
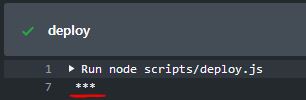
At a previous job, they outlawed all external CI services because they were worried about their AWS IAM keys getting out in the event of a CircleCI data breach. Given that we're dealing with Github + MSoft, I have to believe there's some encryption magic happening when you upload and access these secrets. Once you've set the value in the secrets, you will not be able to see it again and it will only be exposed to the CI agent.
I tried to log one of these secrets, and cleverly, it was censored in the logs (see below). Gone are the days of having to rotate your IAM keys because you accidentally logged it in your CI or Cloudwatch.
I'll come back to those AWS secrets shortly. From this point, all we have to do is deploy. I'm going to offer three suggestions:
- AWS S3 static web hosting
- Github pages
- Now.sh Tutorial coming soon
I would argue that S3 is superior to Github Pages. The unfortunate part of Pages is that it can only serve from files in the repository, so you have to commit your built files in order to host. However, Pages are free forever, unlike S3 sites which will begin to cost if you start having significant traffic. If performance is a concern for you, look elsewhere as neither of these are going to be blazing fast.
I'd suggest going with Github pages for simplicity as you'll avoid setting up an additional account (and potentially save $$).
Most sites I make are not under high demand, nor do they have many concurrent users, so for my purposes, S3 storage is more than enough.
I also use Cloudflare to cache the assets, so the majority of sessions download assets off the Cloudflare CDN, rather than S3, so my usage stays very low for S3. This also has the benefit of using Cloudflare's smart routing to make my Sydney hosted S3 bucket much faster for international users.
S3 Deployment
See the example repository here: https://github.com/3stacks/github-actions-react-s3
First I'll quickly go through how to get your S3 bucket and IAM keys and be a bit responsible in the process.
Create the bucket
- Go to your AWS panel and navigate to S3.
- Click
Create Bucketand give it a url friendly name the same as the domain you will use for. - Choose whatever region is most appropriate for you. I chose Sydney (ap-southeast-2) because most of my traffic is Australian
- Skip step 2
- On step 3, untick the
Block all public accesscheckbox - Visit your bucket, go to Permissions, then to Bucket Policy and paste the below in (replacing the arn)
{
    "Version": "2012-10-17",
    "Statement": [
        {
            "Sid": "PublicReadGetObject",
            "Effect": "Allow",
            "Principal": "*",
            "Action": "s3:GetObject",
            "Resource": "arn:aws:s3:::your-arn-here/*"
        }
    ]
}
With this policy, any user that queries can get any object in the bucket, so please, don't store anything private in there.
- In Properties, go to Static web hosting
- check "Use this bucket to host a website"
- make the index document
index.html - your endpoint will be displayed there
Creating the IAM user
We're going to start by making a policy that is our deployment policy for this bucket. It ensures that if the keys to an IAM user leak all you'll be giving away is access to that single bucket.
- Go to IAM
- Go to Policies on the left
- Change tabs to the JSON editor, rather than the Visual Editor
- Paste in the follow, replacing the ARN with your own bucket's ARN
- Name your policy. I called mine [projectName]DeployPolicy
{
    "Version": "2012-10-17",
    "Statement": [
        {
            "Sid": "VisualEditor0",
            "Effect": "Allow",
            "Action": "s3:ListBucket",
            "Resource": "arn:aws:s3:::your-arn-here.io"
        },
        {
            "Sid": "VisualEditor1",
            "Effect": "Allow",
            "Action": ["s3:PutObject", "s3:GetObject", "s3:DeleteObject"],
            "Resource": "arn:aws:s3:::your-arn-here.io/*"
        }
    ]
}- On the left, navigate to Users
- Create a User
- Give it a relevant name ([projectName]DeployUser?), tick
Programmatic Access - Select
Attach existing policies directly - Search for your newly created policy and attach it to the user
- Click through the wizard
- Take note of your Access Key ID and Secret access key
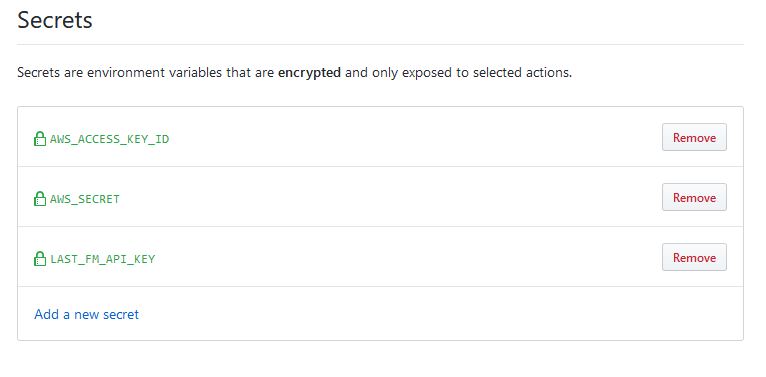
Storing and using the secrets
- Visit https://github.com/3stacks/[yourProject]/settings/secrets
- Click 'Add a new secret'
- Call it
AWS_ACCESS_KEY_IDand copy the corresponding value from your newly created IAM user - Repeat for
AWS_SECRET
Now your Github Action will pick these up in ci.yml. Copy the contents
of the deployment script from here: https://github.com/3stacks/github-actions-react-s3/blob/master/scripts/deploy.js
to a directory (./scripts/ is what was defined in ci.yml, but you
can change this if you prefer a different directory). Make sure you update
the S3 bucket name on line 24.
Your ci.yml workflow should resemble the below:
ci.yml
name: CI

on:
    pull_request:
    push:
        branches:
            - master

jobs:
    build:
        runs-on: ubuntu-18.04

        steps:
            - uses: actions/checkout@master
            - name: Use Node.js 10.x
              uses: actions/setup-node@v1
              with:
                  version: 10.x
            - name: Build
              run: |
                  npm install
                  npm run build --if-present
            - name: Deploy
              if: github.event_name == 'push' && github.ref == 'refs/heads/master'
              env:
                  AWS_DEFAULT_REGION: ap-southeast-2
                  AWS_ACCESS_KEY_ID: ${{ secrets.AWS_ACCESS_KEY_ID }}
                  AWS_SECRET_ACCESS_KEY: ${{ secrets.AWS_SECRET }}
              run: node ./scripts/deploy.js
Ensure you set the region you would prefer in the deploy env.
Now we're done! Commit those changes, push it and you'll see the build run and deploy your app.
Visit http://[bucketName].s3-website-ap-southeast-2.amazonaws.com/ to verify.
From now on, commit on master and your code will be deployed automatically.
Github pages deployment
See the example repository here: https://github.com/3stacks/github-actions-react-pages
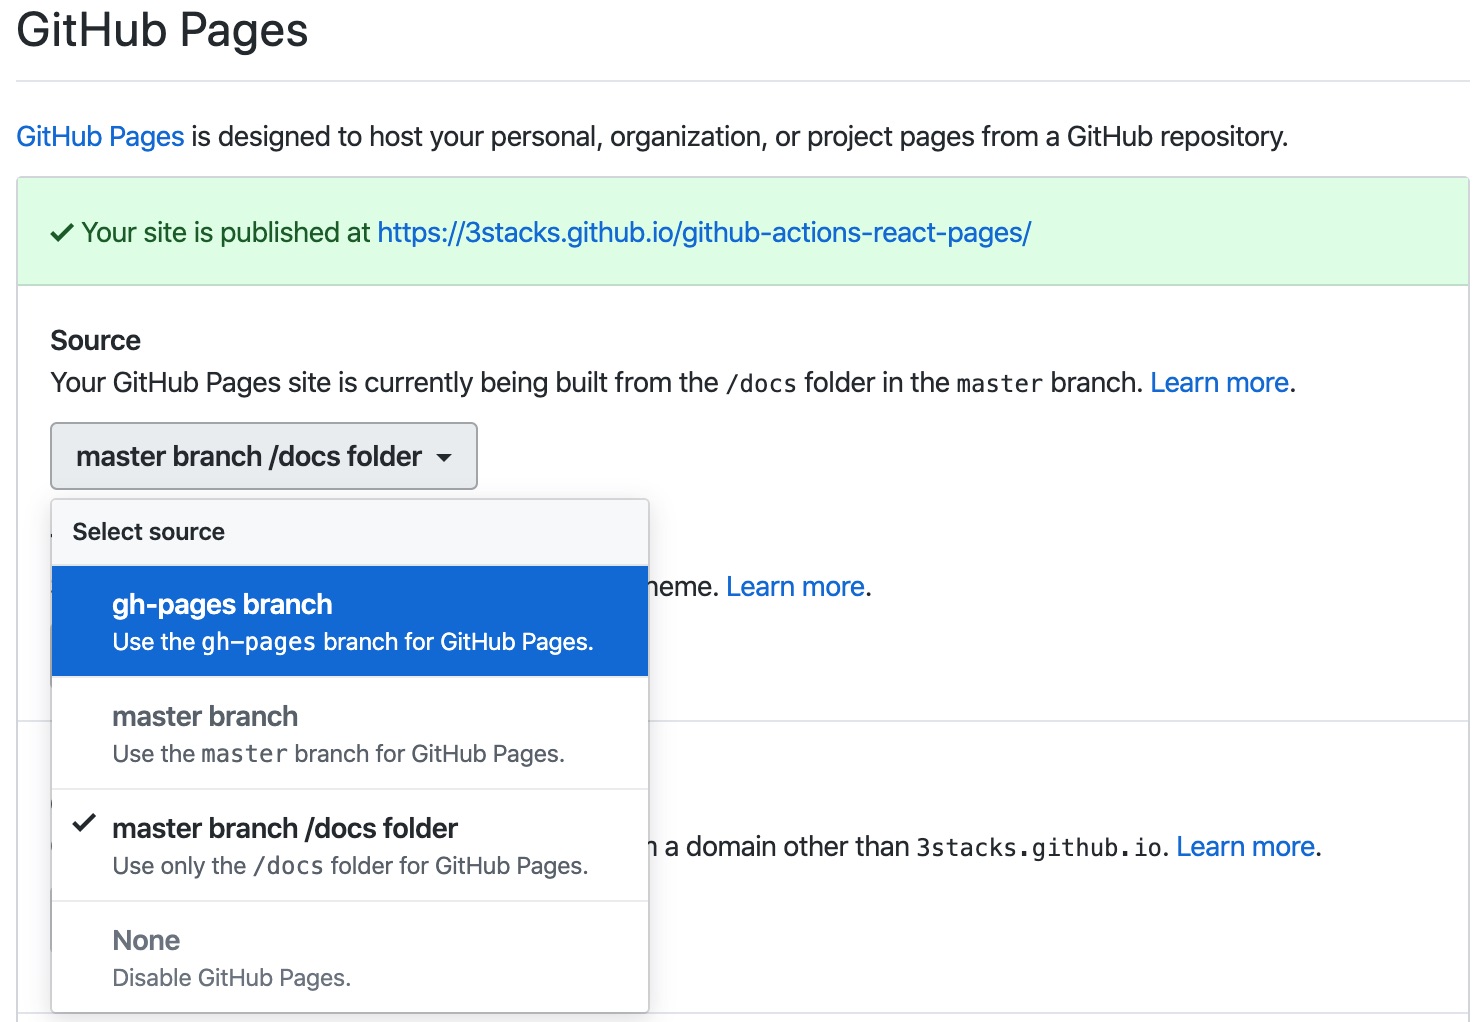
Visit https://github.com/[yourName]/[yourRepo]/settings and scroll to the Github Pages section.
Here you may enable github pages on the master branch or gh-pages, root folder (i.e. you build into root directory) or master
branch /docs. I prefer to use a separate branch as it's generally
advisable to keep your master branch clean of build files.
To enable the gh-pages branch, the repo must already
have one. In your terminal, do the following:
git checkout -B gh-pages
git push origin gh-pages
Back in your browser, select the gh-pages branch in the Pages
dropdown (See below):
From here, deployment is fairly painless. Let's take advantage of the Actions ecosystem Github is building and use: https://github.com/marketplace/actions/deploy-to-github-pages?version=1.1.2, an action written by James Ives.
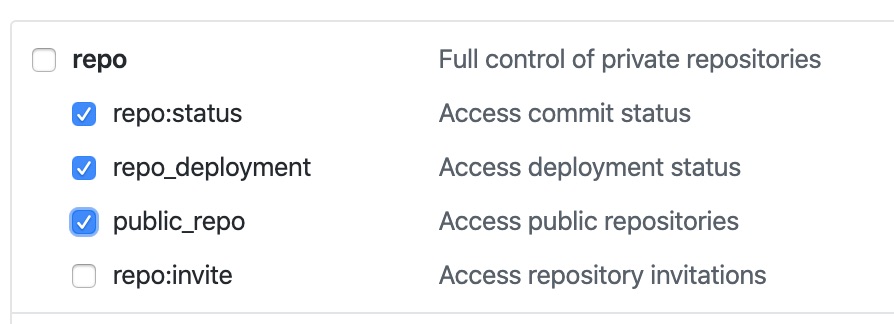
First we have to generate a personal access token.
- Go to https://github.com/settings/tokens
- Click
Generate new token - Select the appropriate scopes. We only need repo related scopes (below)
- Do not share this key with anyone. It has access read/write access all your repositories *
Add the secret as per the Storing and using the secrets section
above, calling your access token secret GITHUB_ACCESS_TOKEN
Back in ci.yml,
name: CI

on:
    pull_request:
    push:
        branches:
            - master

jobs:
    build:
        runs-on: ubuntu-18.04

        steps:
            - uses: actions/checkout@master
            - name: Use Node.js 10.x
              uses: actions/setup-node@v1
              with:
                  version: 10.x
            - name: Build
              run: |
                  npm install
                  npm run build --if-present
            - name: Deploy to GitHub Pages
              uses: JamesIves/github-pages-deploy-action@1.1.3
              if: github.event_name == 'push' && github.ref == 'refs/heads/master'
              env:
                  ACCESS_TOKEN: ${{ secrets.GITHUB_ACCESS_TOKEN }}
                  BRANCH: gh-pages
                  FOLDER: build
Our secret and other required arguments will be provided to the Pages
Deploy action using the env key.
If you aren't using a custom domain
Due to the way the routing is done in github pages, assets referencing
/ will go to the root of your Pages (e.g. https://3stacks.github.io).
This means none of the assets in CRA will be loaded. To get around this,
in your package.json, add "homepage": ".",. This will make it resolve
correctly.
Now we're done! Commit those changes, push it and you'll see the build run and deploy your app.
Visit http://[yourName].github.io/[repo-name] to verify.
From now on, commit on master and your code will be deployed automatically.
Now.sh deployment
COMING SOON - This section is not complete
Tidbits
Containerised Steps
Github Actions also supports using specific Docker containers
from Dockerhub. So if you have complicated dependencies, you can
choose to utilise this option. Use the uses key and give it a path
in the format of: docker://[image]:[tag]
https://help.github.com/en/articles/configuring-a-workflow#referencing-a-container-on-docker-hub)